through the Silhouette America online store.
The file includes large pattern parts (all components fit 8.5x11 paper)
that are joined into whole size shapes to cut fabric to sew this project.
Ovals are cut file shapes that can be set up to allow Cameo
to cut from fusing-backed fabric (Silhouette's sew-in "fabric interfacing").
If you would like to receive six printer-size pages of the pattern
that include text and directions to assist with this tutorial,
email the request to Jodi at hearthsewnpatterns(at)yahoo(dot)com.
To receive the print files attachment, you will need to have
purchased the Christmas Stocking Hidden Wreath Pattern file.
(A return email will be sent with a question to verify this.)
TUTORIAL:
Body Construction
1. Cut and join the cardstock pattern pieces you will need to mark and cut the stocking. Pattern pieces include small symbols near the "center" joining edges to help match the halves. (L to R: cuff trim, cuff, body.
Materials (approximate) you will need:
1/3 to 1/2 yard for body
1/3 yard for lining (backing)
1/6 yard for cuff front
scraps for wreath ovals (6 light, 4 dark)
1/2 yd. for cuff back, cuff trim, piping, loop
1.25 yds. 3/16" poly cord for piping (optional)
batting or flannel
2 small buttons
All cutting pattern pieces include 1/4" seam allowances.
2. Trace and cut 1 FRONT STOCKING BODY from face fabric. Cut a BACK STOCKING BODY rectangle 10x18 (to be layered and quilted as desired, then joined to prepared front).
Trace and cut CUFF FRONT, CUFF BACK (should match trim fabric), TRIM, LOOP. Also cut a 45-50" 1.25" wide bias strips for piping (optional but recommended).
3. As the FRONT BODY is traced, also fold pattern at perforations to mark the top guideline for ovals positioning and the center mark, and the ribbon trim position lines, using temporary marking tool.
4. Extend the center mark vertically for about 10 inches. Use the small cutout shape to make guide "ticks" to each side of the center mark, marking the center AND the edges. Repeat this set of marks toward the lower 1/3 of the body. You will need 3 marks to each side of center.
Repeat the process from the top marked guideline downward. You will need 11 marked "rows" in addition to the previously-marked top guide line. Use a straight edge (ruler) to connect the marks to show a grid.
5. Prepare the fabric to cut the ovals. Working in Deluxe Studio or Studio, Move the oval onto the cutting mat and duplicate for the number of shapes you will cut from each of the light green fabrics. For the sample project, 6 light green fabrics were used, cutting 9 ovals from each (with a couple left over). Arrange the ovals fairly close to each other so that they will fit into a rectangle approx. 5.5" x 10".
Cut six 5.5" x 10" rectangles from paper-backed fusible web (Silhouette America calls this sew-in fabric interfacing). Fuse the rectangle to the BACKSIDE of each scrap of light green. Trim fabric even with paper backing. (I like to remove the paper backing at this poing, though the Silhouette tutorials recommend leaving the paper in place.)
6. Adjust cut tool settings for "cotton canvas". Position the fabric rectangle FACE SIDE UP on the cutting mat corresponding to your positioning of the oval cut lines on your screen. Use "credit card" tool to smooth and make sure the fabric is securely in place. Send the file to cut.
Remove the excess surrounding fabric, then use a spatula tool to lift the ovals from the mat.
7. Repeat the screen set up, fabric prep, mat positioning and cutting process for the dark green fabrics. Determine how large a rectangle a single oval will fit into to safely cut (approx. 1/2" margins on each side). Cut fusing that size for each of the four fabrics, then fuse to fabric and trim. Lay each of these rectangles side by side on the mat.
Next arrange the ovals on the screen to match the fabric placement. (Create the bounding rectangle with the center oval, duplicate and place side by side, then DELETE the rectangles.)
Here you can see that cutting in this stream-lined way really works.
(You can place and cut ovals one at a time, too.)
8. Arrange the ovals on the stocking front within the temp marked grid. Be sure to position the "hidden" wreath darker ovals as desired. Follow the pattern layout included in the cut file as non-cut lines, noting that the bottom rows are not complete.
(This image is oriented with the left side as the TOP of the stocking. Also note that the edge cutting line of my stocking front is still just a MARKED line. Leaving excess beyond the cutting line until the applique stitching is completed helps preserve the edge from excessing fraying.)
9. Use iron to press and fuse the ovals in place, following product directions. Finish the raw edges of the appliques with a machine over-edge stitch, such as the "blanket" stitch I am using here, or a narrow zigzag or other decorative stitch. Use matched color thread.
Position and fabric-glue cut-to-size ribbon lengths at the guidelines near the toe.
10. Layer the stocking with batting or equivalent, and lining (backing). Pin or hand baste with large stitches to secure layers.
11. Quilt as desired. To follow the sample, extend the vertical grid lines upward to cuff edge. Quilt following these lines between the rows of ovals, switching to echo the ovals shape at the bottom of the ovals panel.
Also topstitch the ribbon strips in place using matched thread.
Baste next to the stocking outer edge (or next to cut line if not trimmed at this point). Make sure basting is not beyond the 1/4" seam allowance that is included at each edge.
12. Prepare piping. Join bias strips into one length. Enclose cord against BACK side of fabric and align raw edges. Baste next to cord. Trim excess fabric 1/4" beyond basting.
13. "Shape" piping end by releasing 3-4 stitches at end, pulling cord out slightly, and cutting away approx. 1/2". Reposition fabric and flatten at end.
(continued with next image)
Begin at top right edge of stocking upper (opening) corner. Position flattened edge of piping so that it crosses side seamline approx. 1/4" below top edge. Begin the attachment by basting 3-4 stitches, until this "new" basting intersects with the piping baste stitching, then swing the piping raw edge to align with stocking layers raw edges. process.
 The piping basting should now be exactly on top of the stocking seamline, or 1/4" in from edge. Continue positioning and basting the piping to the stocking layers EXACTLY on the previous baste stitching. At the opposite "opening" corner, repeat the shaping process.
14. Lay the stocking front over the layered and quilted stocking back. (Quilt back layers as desired; I followed the vertical "guidelines" of the print I was using to complete quilting lines approx. 1.5" apart.) Pin securely.
Stitch (not BASTE this time) exactly on the previous basting line at stocking edge, backstitch-locking at each opening end.
Trim backing to match stocking front all around.
15. Over-edge raw edges using a wide and long machine zigzag.
Turn stocking FACE side out. Work seam/piping fully out and press well.
Then turn FACE side in again.
 Cuff Construction
16. Use Pressing Guide to trace inner shaped line onto the BACK of the cut trim piece.
17. Clip through seam allowance ALMOST TO TRACED LINE at the curved portion of trim shape.
18. Place Pressing Guide over backside of trim piece on ironing board. Use iron tip to press fabric seam allowance back over the cardstock edge. Press the complete length of the shaped edge.
This is how the trim should look when pressed.
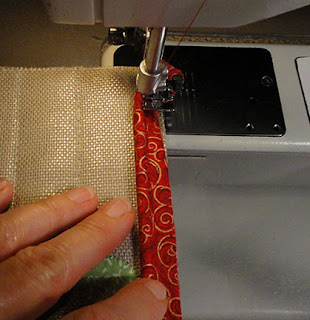
19. Place the trim over the FACE SIDE of cuff shape, raw edges aligned with the cuff raw edge. Pin well. Top-stitch next to the fold edge with matched thread.
20. Layer the cuff with cuff lining as shown. Stitch seam along curved edge, taking care that stitching remains a consistent distance from previous top-stitching which can be seen from the backside of cuff front as a reference. Lock stitches at both ends.
Turn right side out. Work seam out fully, and press well. Baste opening close to edge.
21. Pin cuff at stocking opening edge:
a. stocking is FACE side inward.
b. cuff FACE side is laid against stocking body INSIDE.
c. cuff right end is positioned first
d. place right end slightly less than one-third in from the side seam, attaching to the FRONT of the stocking.
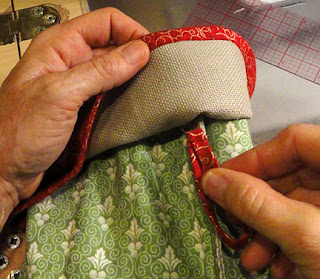
22. Before stitching cuff in place, prepare the hanging loop (both long edges folded to center, folds brought together and topstitched; ends layered and basted together). Insert loop ends between cuff and body at right side seam. Pin in place.
Stitch around cuff opening seam. Over-edge stitch raw edges.
23. Turn stocking FACE side out, fold cuff over into final position. Work opening seam out fully, and press (make sure loop is extending from seam).
Arrange cuff curved overlap and tack invisibly if desired. (You need to look closely here, but there is a hand needle performing the invisible tacking operation.)
24. Prepare covered buttons and attach in place. Tie a small ribbon bow and invisibly tack in place.
DONE!
Check out the other stocking designs available from SnapDragon Snippets and the Silhouette America online store. You can search by typing "stocking" or "Jodi G. Warner" in the search window.
Happy quilt crafting!


