Sunday, August 28, 2016

Bat Wrap Wings Card Tutorial

With wings folded, timid bat 
barely peeks over the top. 
Open the wings to reveal "HALLOWEEN" greeting, 
and penny-slide the little guy's head up, 
and he is ready with a grin. 
A7 (5x7) size range when folded. 
Includes a letters positioning guide to cut and use. 
Multiple body and head/neck slider layers make card sturdy.

ASSEMBLY: 1. Identify and cut the shapes:
A main bat "front" body with wing (choose
a two-sided paper such as a solid.
NOTE that the shape is shown backside up)  
B left wing
C left & right outer wing accents
D feet   E "HALLOWEEN" letters
F letter placement guide
G body slot build up layers (3)
H back body with slider slot    I penny cover
J back head    K back head reinforcement
L head build up layers (5)
M front head with eye and mouth accents
N head liner (mouth, ears show thru)
O face accents (eye, under-eye, fangs, tongue) 
2. Prepare the left wing by folding the inner flange
back (mountain fold). 
3. Position and attach wing to main body front
with tab flange behind the body edge.
NOTE the body shapes are shown
back side up in steps 2-4.)
4. Position and attach the letters to the face side
of the main body unit, using the optional
placement guide, aligned (but NOT glued)
along the top of the body shape as shown.
The letters can be glued in place, while the
guide is simply laying over the wing shape,
then the guide is removed . . .
. . . to leave just the letters in place.
NOTE that letters placement must avoid
the wing folds (placement guide ensures this spacing).
5. Position and attach the wing edge accents
on the FACE side of the wings, with edges lined up.
6. Prepare the build up shapes by gluing together
the following shapes, taking care to line up edges
as accurately as possible:
a) head and head reinforcement
b) body build up - 3 shapes
c) upper head - 5 shapes
NOTE it may be helpful to place the
assembled units under flat weights during
the drying process to help avoid warping -
here and throughout the steps involving
the build up shapes.
7. Position and attach the body build up shape
at the backside lower portion of the
back body.
Position the back body unit behind the
body/wings front unit, lining up the edges
the match as accurately as possible.
8. Prepare the front head by positioning
and attaching
the layered eye outline & eye base,
eye pupil and contrast under shape,
mouth outline as shown.
9. Position and attach the head front unit over
the contrast liner that will shown through
ears and mouth cutouts.
10. Position the fang teeth below the
mouth outline evenly spaced in from
mouth sides, and the tongue along the lower edge.
11. Identify the position guide dashed circle
for the foam "stem" of the slider action
at the center of the back head unit.
(NOTE since the paper used for this model
is colored and textured, the markings were
easier to see on the backside which is shown here.)
Trim a foam circle to match the guide,
or use the "slider stem template".
The foam circle must fit inside the slot opening
on the back body, relatively snug, but with
no impeding interference.
Position and attach securely on the
face side of the back head.
12. Position the "inner" head build up layers on
the backside of the front head/face unit.
13. Position the back head unit over the
backside of the build up and attach in place
to the build up ONLY.
Bottom remains free so that it can slide over 
the body build up.
This image shows the same step from the
front of the assembly.
13. Begin final assembly of the slider by
inserting the head back stem between  the
back body and the front body/wings . . .
. . . and slide into place until the foam circle
can fit into the back body slot as shown.
14. Position and attach (hot glue or other
similar quick grab, secure adhesive)
penny or equivalent size metal washer
on the foam circle.
15. Position and attach the penny cover.
To close the card with the "shy" bat position,
slide the head down to lowest position,
and close wings.
Use penny to slide the head up to the
high position when opened.
Fold wings across to prepare to send card.
You may wish to use a temp adhesive dot
on the underside of the top wing to
help the card stay in the closed position.


Pumpkin Trapezoid Gift Box

Junior Jack O'Lantern has stem on top 
with vine swirl and left, vine and layered leaf on right,
 all with tabs that fit into matched slots for "hidden" construction.  
Mouth and eye openings in first under-lay provide 
a thickened "cut out" feel to face, 
with eye pupils attached to front layer, 
and tiny tooth attached to back under-lay 
which acts as show-thru interior shadow or "candle light". 
Top flap wraps toward back for slot & tab closure. 
Measures approx. 6" wide x 5" tall x 3.5" deep. 

ASSEMBLY: 1. Identify and cut the shapes:
A main box front/side   B box back/side
C face underlay for build up effect
D face opening contrast liner
(NOTE D is divided to give show-thru
options for mouth and eyes; C allows
D shapes to match up when attaching.)
E contrast eye pupils, tooth accents
F front & back RIGHT side vines
G front & back LEFT side vines
H front stem with bottom shaped tab, back stem
I front leaf and accent overlay   J back leaf
2. Prepare the box shapes by bending back
on all perforation lines for panels and tabs.
Position and attach the face openings build up
layers behind the face.
3. Position and attach the contrast "show thru"
liner shapes behind the build up shapes.
4. Position the pupil accents over the pupils
of the main shape. Position the tooth inside
the mouth opening and attach to the contrast liner.
5. Position the side tab under the straight side
edge of the box front and attach to
join the box main shapes.
6. Prepare the right vine shapes by 
bending the end tabs forward.
Layer back to back and join into one unit,
leaving tabs unattached.
7. Prepare the leaf shapes in similar manner.
Position and attach back to back, leaving
tabs unattached.
8. Prepare the BACK vine/stem and the front stem
by bending the bottom tabs forward for each.
Position back to back, and attach the stem upper
portion to the matching portion of the back stem.
Bottom tabs should remain unattached.
9. Position the front stem over the exposed
portion of the back stem, back to back, and
attach.
10. Position the back stem accent over the
top of the back stem/vine unit, and attach.
12. Bend tabs together (flat) and insert
stems into corresponding slots on right body side
panel. On the inside, bend tabs outward . . .
. . . and glue to backside of side panel.
NOTE you may wish to place the box panel
flat on a flat surface to apply pressure
in the area of the tabs underneath.
13. Insert leaf tabs through slots on left side box panel,
bend tabs outward on the inside, and glue in place.
14. Form the box into a tube to bring together
remaining side edge to overlap corresponding
tab to perforation line. Glue edge to tab.
15. At box bottom, fold the FRONT tab only to
the inside of the box and glue in place.
(This acts to reinforce front lower edge;
tab can also be trimmed off, if preferred.)
16. Bend bottom side tabs toward center,
bend bottom panel into position, tucking
the curved tab into the box.
Glue all bottom tabs together in these positions
to secure box shape.
17. At box top panel "lid", insert the (green) back stem tab
into the slot, bend tab toward box back on the
underside of lid, and glue in place.
On the outside of lid, apply adhesive to the
underside of the front stem shaped bottom "tab"
and attach to the lid.
18. To close the box, bend the lid into position
(left vine will move into position to cross the
leaf in front or behind as you choose)
and insert the long closure tab through
the top slot . . .
. . . and then through the bottom slot.
It may be helpful to use a blade tool such as this
spatula to help guide the tab back up through
the lower slot.
Here is the completed pumpkin trapezoid box.

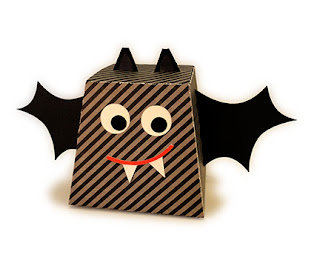
Bat Trapezoid Treat Box Assembly

Perky creature of the night has dimensional ears 
and wings that extend from slots in box top or sides. 
Top flap wraps toward back for slot & tab closure. 
Measures approx. 8" wide (wingspan) x 4" tall x 3.5" deep. 

ASSEMBLY:  1. Identify and cut the shapes:
A main box front and side
B box back and side
C wing pairs
D ears combo shape
E eye "liner" shape with pupils
F smile  G fangs unit
2. Join the box halves by overlapping the straight
side edge at the corresponding side tab to
the perforation line, and gluing in place.
3. Insert the fangs unit through the mouth slit
on the box front, center with fangs fully exposed,
and glue in place, front teeth and back connector tab.
4. Position the mouth shape so that the lower edge
of mouth lines up with cut edge, center, and
glue in place.
5. Position and attach the eye "liner" panel
centered behind the eye circle cutouts.
This is how the front panel should appear
viewed from the backside.
6. Position and attach the eye pupils
within the circle eye cutouts.
7. Form the box into a tube to bring the
straight side edge to overlap 
the front tab perforation line, and glue in place.
NOTE it may be helpful to flatten the box
to allow finger pressure to be applied fully along
the side seam.
8. Prepare the left and right wing units by
first bending the tabs forward (valley fold), then . . .
. . . placing a front and back wing pair together
back to back, and gluing together, leaving
the tabs free and unattached.
9. Apply adhesive the the face side of the tabs,
then . . .
. . . insert the wings through side slots
(note which edge is the TOP of the wing;
also NOTE that while this image implies
otherwise, if may be EASIER to insert
the tip of the wing through the slot from the INSIDE
of the box) . . .
. . . until the wing is fully extended, with
tabs attaching to the inside box panel surface.
Insert a wing on both left and right sides of box.
Here is the view of wing tabs attached
on the inside.
10. Prepare the ears unit by bending in half (mountain)
and bending tabs outward (valley folds).
11. If desired for contrast, color the "whole"
surface underside as shown.
12. Fold the ear unit in half and glue the cutout
margins to the back section, leaving tabs unattached.
13. Apply glue to the face  surface of the tabs . . .
. . . insert ear tips through the individual slots
on the box "lid" until they seat completely
with tabs attaching to underside of lid.
14. At box bottom, fold the FRONT tab only to
the inside of the box and glue in place.
(This acts to reinforce front lower edge;
tab can also be trimmed off, if preferred.)
15. Bend bottom side tabs toward center,
bend bottom panel into position, tucking
the curved tab into the box.
Glue all bottom tabs together in these positions
to secure box shape.
16. To close the box, bend the lid into position
and insert the long closure tab through
the top slot . . .
. . . and then through the bottom slot.
It may be helpful to use a blade tool such as this
spatula to help guide the tab back up through
the lower slot.
Here is the completed bat box.