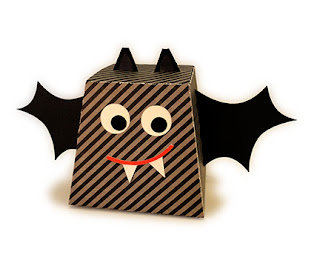
Perky creature of
the night has dimensional ears
and wings that extend from slots in box top or
sides.
Top flap wraps toward back for slot & tab closure.
Measures approx.
8" wide (wingspan) x 4" tall x 3.5" deep.
ASSEMBLY: 1. Identify and cut the shapes:
A main box front and side
B box back and side
C wing pairs
D ears combo shape
E eye "liner" shape with pupils
F smile G fangs unit
2. Join the box halves by overlapping the straight
side edge at the corresponding side tab to
the perforation line, and gluing in place.
within the circle eye cutouts.
to allow finger pressure to be applied fully along
the side seam.
then . . .
on the inside.
margins to the back section, leaving tabs unattached.
13. Apply glue to the face surface of the tabs . . .
. . . insert ear tips through the individual slots
on the box "lid" until they seat completely
with tabs attaching to underside of lid.
(This acts to reinforce front lower edge;
tab can also be trimmed off, if preferred.)
It may be helpful to use a blade tool such as this
spatula to help guide the tab back up through
the lower slot.
A main box front and side
B box back and side
C wing pairs
D ears combo shape
E eye "liner" shape with pupils
F smile G fangs unit
side edge at the corresponding side tab to
the perforation line, and gluing in place.
3. Insert the fangs unit through the mouth slit
on the box front, center with fangs fully exposed,
and glue in place, front teeth and back connector tab.
4. Position the mouth shape so that the lower edge
of mouth lines up with cut edge, center, and
glue in place.
5. Position and attach the eye "liner" panel
centered behind the eye circle cutouts.
This is how the front panel should appear
viewed from the backside.
6. Position and attach the eye pupilswithin the circle eye cutouts.
7. Form the box into a tube to bring the
straight side edge to overlap
the front tab perforation line, and glue in place.
NOTE it may be helpful to flatten the boxto allow finger pressure to be applied fully along
the side seam.
8. Prepare the left and right wing units by
first bending the tabs forward (valley fold), then . . .
. . . placing a front and back wing pair together
back to back, and gluing together, leaving
the tabs free and unattached.
9. Apply adhesive the the face side of the tabs,then . . .
. . . insert the wings through side slots
(note which edge is the TOP of the wing;
also NOTE that while this image implies
otherwise, if may be EASIER to insert
the tip of the wing through the slot from the INSIDE
of the box) . . .
. . . until the wing is fully extended, with
tabs attaching to the inside box panel surface.
Insert a wing on both left and right sides of box.
Here is the view of wing tabs attachedon the inside.
10. Prepare the ears unit by bending in half (mountain)
and bending tabs outward (valley folds).
11. If desired for contrast, color the "whole"
surface underside as shown.
12. Fold the ear unit in half and glue the cutoutmargins to the back section, leaving tabs unattached.
13. Apply glue to the face surface of the tabs . . .
. . . insert ear tips through the individual slots
on the box "lid" until they seat completely
with tabs attaching to underside of lid.
14. At box bottom, fold the FRONT tab only to
the inside of the box and glue in place.(This acts to reinforce front lower edge;
tab can also be trimmed off, if preferred.)
15. Bend bottom side tabs toward center,
bend bottom panel into position, tucking
the curved tab into the box.
Glue all bottom tabs together in these positions
to secure box shape.
16. To close the box, bend the lid into position
and insert the long closure tab through
the top slot . . .
. . . and then through the bottom slot.It may be helpful to use a blade tool such as this
spatula to help guide the tab back up through
the lower slot.
Here is the completed bat box.


No comments:
Post a Comment