
Spooky-fun Halloween decor.
Fancy cut bat
overlays with optional contrast bat base,
offset main bat base (built up multi
layers for strength)
with slotted back bat base to hold the dimensional
"body".
Tall "Swirls" overlay design fits a commercial
jewels decoration by "Recollections", 11" tall.
Medium "Filligree" overlay measures
approx. 10.125" tall
Hex post (with optional 5/16" dowel inside for strength)
inserts through body at top and two-level stand
with riser at bottom.
Optional
accent shapes (offset slightly) can decorate
base sides & top, riser
panels.
ASSEMBLY: NOTE: Model being constructed here is
"Swirls" variation. Assembly is identical for both designs.
1. Identify and cut the shapes:
A main bat (overlay)
B contrast bat base
C body build up/reinforcement
D back body (with back body slots)
E back body E2 back body top cover
 F main base shape (shown with side accent shapes)
G base side extention (with side accent shapes)
H top accent panel I base bottom cover
J riser (shown with accent shapes)
K pole shape L pole anchor build up circles (8)
M optional pole collar


 9. Apply adhesive, then bend the top end
panel down into place and secure.
Repeat for the bottom end panel.


 22. Form the first angled seam by bending
the straight cut edge to overlap the adjacent
wedge tab to perforation line, and glue in place.
Complete the remaining 4 angled seams
in the same manner.
 23. Form the riser into a tube to bring together
the straight edges and perforation lines.
Overlap the long upper edge and tab first
and complete the seam,
then position and attach the lower portion
of the seam.


 . . . then bend tabs outward on the underside
of the base top, and hold in place
until secure.

 27. Position and attach the anchor on the inside of the base
bottom, positioning so that the hex hole of anchor
lines up exactly with the hex hole of the bottom panel.


 31. Form the shape into a tube to bring the long
straight edge to overlap the opposite tab
to perforation line, and glue in place.
NOTE it will be necessary to work finger pressure
up and down, along the entire seam to secure it.
 HINT: It will also be helpful to insert a 5/16" diam.
wooden down as a form inside the tube
to help tighten the tube into its correct size,
to achieve alignment of the edge to tab perf line.

 Insert cut dowel and push in fully so that
the top is flush with the pole panel top edge.
33. Bend the top "lid" into position, bend tabs
to wrap around pole ends, and glue in place.

 . . . then through the riser top hex opening.


 . . . insert pole through bottom opening of back body
of bat assembly. Push pole through body . . .


 40. Remove the yellow backing layer to expose
the back side of the adhesive layer . . .


ASSEMBLY: NOTE: Model being constructed here is
"Swirls" variation. Assembly is identical for both designs.
1. Identify and cut the shapes:
A main bat (overlay)
B contrast bat base
C body build up/reinforcement
D back body (with back body slots)
E back body E2 back body top cover

G base side extention (with side accent shapes)
H top accent panel I base bottom cover
J riser (shown with accent shapes)
K pole shape L pole anchor build up circles (8)
M optional pole collar

2. If desired, swirl jewels from "Recollections"
Halloween set can be used to decorate the
swirls of the main bat (overlay).
(This set is seasonally available [2016] from
Michael's crafts. Labeled as "Bling Stickers',
with a bar code number 886946933455.)

Determine which portions of the various swirls
in the set fit on the large and smaller swirls of
the overlay, trim with scissors to separate,
then apply to the overlay.

Here you can see the right wing swirls in place,
and the mirror image left swirls section as its
main swirl may fit onto the swirls on that side
of overlay.

3. Position and attach the bat front (overlay) onto
the contrast base.

4. Prepare the back body shape by bending back
on all perforation lines for panels and tabs.

6. Identify the end of the body that should be placed
as "UP" by finding the arrowhead in an upper
tab.

7. Complete angle first top angle seam by
overlapping the straight edge over the adjacent
tab to perf line, and gluing in place.
Complete all angle seams for upper and
lower ends of back body.

panel down into place and secure.
Repeat for the bottom end panel.

10. Insert the back body tabs - with
top end at top of body - into corresponding slots
on the back body.

On the backside of back body, bend the tabs
toward the center . . .

. . . using the body opening to reach fingers inside
to apply pressure to attach tabs to body.
NOTE it may be helpful to use a flat blade tool
such as this spatula to reach under to provide
a "press against" surface

11. Layer and join the body build up shapes,
one at a time, taking care to line up all cut edges
precisely. NOTE that it may be helpful to
use flat weight(s) to press the assembly during
the glue curing process to prevent warping.

12. Position and attach decorative bat body assembly,
center with offset margin all around, on the front
of the body build up stack.

13. Position and attach the buildup/decorative front
unit on the backside of the body back,
taking care to line up all cut edges.

As glue is curing, be sure to apply sufficient
pressure next to the angles of the body
to make sure back does NOT pull away.

14. Prepare the main stand base and the side extension
base shapes by bending back on all perforation lines
for cross bends and tabs except fold forward
on the horizontal line below the tab or top panel
perforation lines. (NOTE this creates the
upper platform side walls as shown near the
fingers on the right side of image.)
15. Position and attach the lower & upper long and short
accent strips to corresponding panels of the stand base.
Position and attach the top accent panel, making sure
that slots line up.

16. Join the side extension to the main stand base
by overlapping the side edge of the lower portion
of the extension at the corresponding lower tab
as shown.

17. Bend the first unattached section into position
to line up the diagonal edge at the
adjacent angled tab, and complete the seam.
Bend and adjust the two top portions of the seam
to line up edge at tab perforation, and
complete the seam.
18. Continue to complete the two-part seams all around
the base in the same manner.

19. Form the base side and extension into a ring
to bring the remaining seam edges together
like the previous side seams, and complete
the final sequence of seams to complete
the base.

20. Bend the top tabs inward, then bend the top
of the stand down into position, adjust edges,
and glue underside to tabs.

21. Prepare the riser shape by bending back
on all perforation lines at tabs and panels.
Position and attach the upper accent shapes
as shown.

the straight cut edge to overlap the adjacent
wedge tab to perforation line, and glue in place.
Complete the remaining 4 angled seams
in the same manner.

the straight edges and perforation lines.
Overlap the long upper edge and tab first
and complete the seam,
then position and attach the lower portion
of the seam.

24. Bend upper tabs toward center,
then bend top into position, adjust, then
attach to tabs.

Turn the riser form top down on a flat surface
then reach in with finger tip to apply pressure
to top panel underside to complete seams.

25. Insert the riser tabs into the slots on the
top panel of the base form . . .

of the base top, and hold in place
until secure.

26. Prepare the pole anchor form by
stacking and gluing the 8 circles together,
one at a time, making sure that the center hex
cut edges line up as exactly as possible.
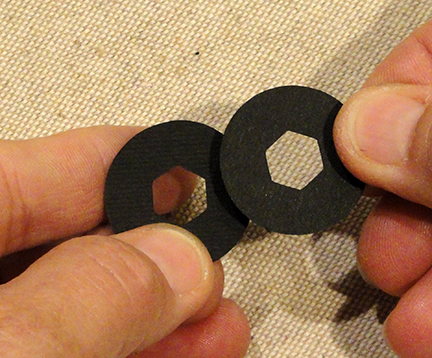
bottom, positioning so that the hex hole of anchor
lines up exactly with the hex hole of the bottom panel.
28. To give the stand more stability, procure metal washers
such as those shown here (Fender Washers 1.25" or so) . . .

. . . then hot glue one centered at each end
on the underside of base's roof.
Position and attach two more washers side by
side in the same position as first washer
on each end.

29. Bend the bottom tabs toward the center,
then bend the bottom panel into position and glue
to the tabs.

30. Prepare the pole shape by bending back on each
of the long perforation lines. Also bend top hex "lid"
and tabs back, and bottom tabs outward.

straight edge to overlap the opposite tab
to perforation line, and glue in place.
NOTE it will be necessary to work finger pressure
up and down, along the entire seam to secure it.

wooden down as a form inside the tube
to help tighten the tube into its correct size,
to achieve alignment of the edge to tab perf line.

32. Measure and cut to size the wooden dowel
to the length of the pole excluding the top lid,
and also excluding bottom tabs.

the top is flush with the pole panel top edge.
33. Bend the top "lid" into position, bend tabs
to wrap around pole ends, and glue in place.

34. Insert top end of pole through stand base
bottom hex opening, up through interior . . .


Push pole fully into position until the bottom tab
perf lines stop even with the bottom panel.
Bend tabs outward and glue in place.

35. Position and attach the bottom "cover"
over the base bottom openings.

36. Bend the pole collar back on each of the
5 perf lines, then . . .

. . . wrap around the base of the pole just above
riser, and attach in place.

37. Apply glue to the top front surface of the pole
from top down 2.5" or so, then . . .

of bat assembly. Push pole through body . . .

. . . until the top of pole is even with the
top opening of body back.
Place assembly with bat face down on flat surface,
and apply pressure to attach pole to bat back
(inside body shape) and below body.

38. Position and attach the body top shape to
hide the pole top.

GLITTER-IZING THE FILIGREE BAT
The following steps illustrate how to use
double-stick adhesive to add glitter to the
filigree bat.
39. Follow instructions on the product packaging
to load and cut the main bat overlay shape from
double-sided adhesive sheet
(Silhouette brand shown here). Detach bat overlay
shape and weed away extra interior pieces.

the back side of the adhesive layer . . .

. . . then position it over the paper overlay with
edges lined up as exactly as possible.

41. Peel back the top protective layer to expose
the sticky layer.

Apply glitter to the adhesive layer . . .

. . . shake off excess (use clean dry paint brush
bristles to brush away excess glitter).
Here is the glitter-ized filigree bat.

Here are the two size bats on their stands.

No comments:
Post a Comment