
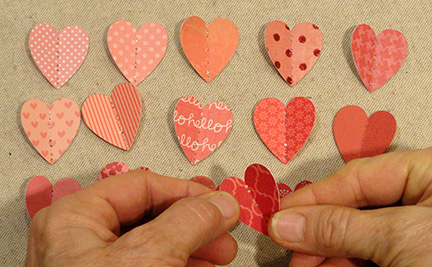
Small hearts cut from fifteen paper prints
are
arrayed in three rows.
Center needle holes on each align
with card front
overlay so that they can be
stitched in place with perle cotton or floss.
Contrast card base is slightly offset,
measures approx. 5x7 when top folded.
ASSEMBLY: 1. Cut the shapes:
card base (gray in this sample)
card accent front with stitching holes
15 hearts with stitching holes & perf lines


 3. Begin with the first (no. 1 position) heart,
apply a thin line of adhesive at the fold
on backside . . .

 4. Thread a 36-40 inch length of perle cotton
(no. 5 recommended) or 6-ply floss into a blunt
tapestry needle. Anchor the tail end with
a small strip of "paper" tape on backside
near the no. 1 top hole.


 6. Insert the needle into the next lower hole
and push through to backside, then draw
thread to backside completely. This is
the first stitch.
Continue in the same fashion to complete
the following three stitches to attach heart no. 1.


 8. Continue to add the next heart, complete
stitches to finish the first column of hearts.
Work the next column bottom to top, then
continue until all hearts are in place
and stitching is completed.

 . . . and anchor with a small piece of tape.

 10. Position and attach the front panel
to the front of the card base to complete the card.


card base (gray in this sample)
card accent front with stitching holes
15 hearts with stitching holes & perf lines

If a gradation color sequence is desired,
consider this method:
Select 15 or more print papers to use,
then line them up in light (no. 1) to dark (no. 15)
order. Step back and "squint" to see if the order
needs adjustment. Select the 15 best,
then cut one heart from each.

One way to arrange the hearts for gradation
from light upper left to darker lower right
is to place the print order hearts as shown.
Switch hearts around as desired or preferred.

2. Bend each of the hearts face-to-face
along the center perforation/holes line.
apply a thin line of adhesive at the fold
on backside . . .

. . . then position it in over the accent front with
holes aligned, and hold in place until secure,
but take care that only the fold area attaches.
(NOTE that the TOP of the front accent card
has a slightly wider margin.)

(no. 5 recommended) or 6-ply floss into a blunt
tapestry needle. Anchor the tail end with
a small strip of "paper" tape on backside
near the no. 1 top hole.

5. Insert the needle into the top hole,
push through to front . . .

. . . and pull through completely.

and push through to backside, then draw
thread to backside completely. This is
the first stitch.
Continue in the same fashion to complete
the following three stitches to attach heart no. 1.

Also complete the stitch below the first heart
as shown.

7. Position and glue heart no. 2 in place . . .

. . . and complete the four stitches plus
the between stitch to attach second heart.
Bend the heart sides upward slightly to make
sure that only the ridge is attached to card front.

stitches to finish the first column of hearts.
Work the next column bottom to top, then
continue until all hearts are in place
and stitching is completed.

9. After the final stitch is complete, draw
the remaining thread fully to the backside,
clip excess leaving approx. 1" tail . . .


Here is the completed hearts panel.
(Quicker than you might think!)

to the front of the card base to complete the card.

Here is the finished card.
Change the hearts color to make this card
fit any occasion: green for St. Patrick's Day,
pastel for Easter, red white and blue for
Independence Day, etc.

No comments:
Post a Comment